


Program Hello World adalah program yang paling terkenal, dan biasanya pertama kali dibuat seorang developer ketika baru pertama kali mempelajari suatu platform. Di dalam komputer yang memiliki display, program tersebut akan menampilkan ke monitor dua kata sederhana “Hello World”
Hello World adalah progam pertama yang dibuat developer untuk menguji sistem. Seorang programmer kala berhasil melihat dua kata tersebut pada layar, berarti mereka telah berhasil berkomunikasi dengan dunia mesin. Dimana code yang dibuat dapat di-compile, dimuat dan dijalankan sehingga muncul keluaran seperti yang diharapkan.
Di dalam dunia mikrokontroler, yang tanpa layar, seorang programmer akan membuat program “hello world” dengan membuat LED yang terhubung dengan GPIO berkedip – kedip. Blinky!. Artinya tidak jauh berbeda kedipan LED tersebut menandakan bahwa seorang programmer telah berhasil menjalin komunikasi dengan dunia mesin.
Pada tulisan kali ini embeddednesia akan mengulas bagaimana caranya memprogram mikrokontroler Tiva C Series, menggunakan Code Composer Studio (CCS) versi 8. Penulis mengasumsikan pembaca telah mengikuti tulisan sebelumnya tentang bagaimana mempersiapkan environment untuk memulai pemrograman mikrokontroler Tiva C Series.
Jika belum mengikuti tulisan sebelumnya, disarankan untuk mempelajari terlebih dahulu bagaimana menginstall Code Composer Studio dan beberapa perangkat lunak yang diperlukan.
Code Composer Studio adalah Integrated Development Environment (IDE) yang mendukung mikrokontroler TI dan prosesor sistem benam. Code Composer Studio terdiri dari seperangkat alat yang digunakan untuk mengembangkan dan mendebug aplikasi embedded. Termasuk compiler C/C++ yang dioptimasi, source code editor, project build environent, debugger, profiler, dan berbagai fitur yang lain.
CCS mendukung pengembangan aplikasi pada sejumlah mikrokontroler high-end dan prosesor benam seperti mikrokontroler MSP, Mikrokontroler realtime C2000, Mikrokontroler SimpleLink Wireless, Prosesor Sitara (Cortex A dan ARM), prosesor C3x/C4x/DSP TMS320x
Jalankan Code Composer Studio, tunggu beberapa saat sehingga splash screen muncul seperti tampilan berikut
Beberapa saat kemudian pengguna akan diminta untuk mengatur lokasi workspace dari CCS. Pengguna bisa menyesuaikan dengan kebutuhan, kemudian klik button Launch

Jika ini adalah pertama kalinya CCS8 dijalankan pada workspace tersebut. CCS8 akan menampilkan window Getting Started. Juga terdapat video tutorial yang memberikan gambaran kepada pengguna bagaimana menggunakan CCS untuk memprogram Mikrokontroler
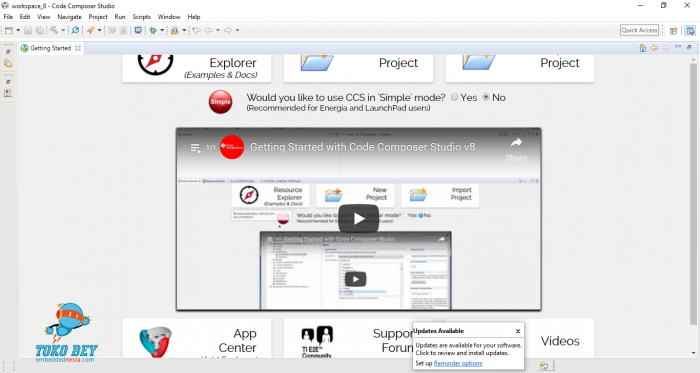
- TI Resource Explorer (TIREX)
CCS memiliki fitur Resource Explorer yang dapat digunakan programmer untuk mengakses semua resource terkait mikrokontroler Tiva C Series, mulai dari dokumentasi, datasheet hingga contoh program. Pengguna bisa memilih Resource Explorer, atau melalui menu View > Resource Explorer. pastikan komputer terkoneksi dengan internet.

Pada panel Resource Explorer, expand direktori Software dan pilih TM4C ARM Cortex M4F MCU > Development Tools > DK – TM4C123G > Examples > Blinky
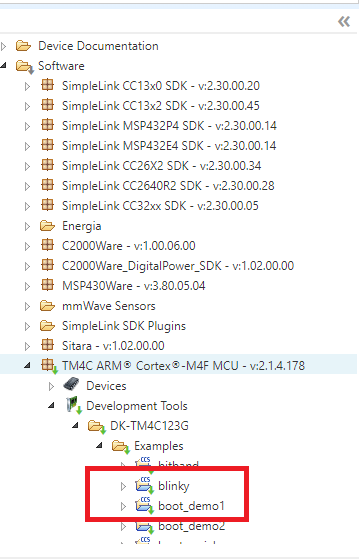
- Blinky
Untuk mengunduh project sampel blinky, klik button Import to IDE
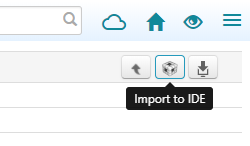
Setelah project blinky berhasil diunduh, perhatikan code pada main.c
This file contains hidden or bidirectional Unicode text that may be interpreted or compiled differently than what appears below. To review, open the file in an editor that reveals hidden Unicode characters.
Learn more about bidirectional Unicode characters
| //***************************************************************************** | |
| // | |
| // blinky.c – Simple example to blink the on-board LED. | |
| // | |
| // Copyright (c) 2011-2017 Texas Instruments Incorporated. All rights reserved. | |
| // Software License Agreement | |
| // | |
| // Texas Instruments (TI) is supplying this software for use solely and | |
| // exclusively on TI's microcontroller products. The software is owned by | |
| // TI and/or its suppliers, and is protected under applicable copyright | |
| // laws. You may not combine this software with "viral" open-source | |
| // software in order to form a larger program. | |
| // | |
| // THIS SOFTWARE IS PROVIDED "AS IS" AND WITH ALL FAULTS. | |
| // NO WARRANTIES, WHETHER EXPRESS, IMPLIED OR STATUTORY, INCLUDING, BUT | |
| // NOT LIMITED TO, IMPLIED WARRANTIES OF MERCHANTABILITY AND FITNESS FOR | |
| // A PARTICULAR PURPOSE APPLY TO THIS SOFTWARE. TI SHALL NOT, UNDER ANY | |
| // CIRCUMSTANCES, BE LIABLE FOR SPECIAL, INCIDENTAL, OR CONSEQUENTIAL | |
| // DAMAGES, FOR ANY REASON WHATSOEVER. | |
| // | |
| // This is part of revision 2.1.4.178 of the DK-TM4C123G Firmware Package. | |
| // | |
| //***************************************************************************** | |
| #include <stdint.h> | |
| #include <stdbool.h> | |
| #include "inc/hw_memmap.h" | |
| #include "driverlib/debug.h" | |
| #include "driverlib/gpio.h" | |
| #include "driverlib/sysctl.h" | |
| //***************************************************************************** | |
| // | |
| //! \addtogroup example_list | |
| //! <h1>Blinky (blinky)</h1> | |
| //! | |
| //! A very simple example that blinks the on-board LED. | |
| // | |
| //***************************************************************************** | |
| //***************************************************************************** | |
| // | |
| // The error routine that is called if the driver library encounters an error. | |
| // | |
| //***************************************************************************** | |
| #ifdef DEBUG | |
| void | |
| __error__(char *pcFilename, uint32_t ui32Line) | |
| { | |
| while(1); | |
| } | |
| #endif | |
| //***************************************************************************** | |
| // | |
| // Blink the on-board LED. | |
| // | |
| //***************************************************************************** | |
| int | |
| main(void) | |
| { | |
| volatile uint32_t ui32Loop; | |
| // | |
| // Enable the GPIO port that is used for the on-board LED. | |
| // | |
| SysCtlPeripheralEnable(SYSCTL_PERIPH_GPIOG); | |
| // | |
| // Check if the peripheral access is enabled. | |
| // | |
| while(!SysCtlPeripheralReady(SYSCTL_PERIPH_GPIOG)) | |
| { | |
| } | |
| // | |
| // Enable the GPIO pin for the LED (PG2). Set the direction as output, and | |
| // enable the GPIO pin for digital function. | |
| // | |
| GPIOPinTypeGPIOOutput(GPIO_PORTG_BASE, GPIO_PIN_2); | |
| // | |
| // Loop forever. | |
| // | |
| while(1) | |
| { | |
| // | |
| // Turn on the LED. | |
| // | |
| GPIOPinWrite(GPIO_PORTG_BASE, GPIO_PIN_2, GPIO_PIN_2); | |
| // | |
| // Delay for a bit. | |
| // | |
| for(ui32Loop = 0; ui32Loop < 200000; ui32Loop++) | |
| { | |
| } | |
| // | |
| // Turn off the LED. | |
| // | |
| GPIOPinWrite(GPIO_PORTG_BASE, GPIO_PIN_2, 0); | |
| // | |
| // Delay for a bit. | |
| // | |
| for(ui32Loop = 0; ui32Loop < 200000; ui32Loop++) | |
| { | |
| } | |
| } | |
| } |
Program tersebut memerintahkan mikrokontroler untuk memberikan output 1 dan 0 bergantian pada GPIO PORTG 2 yang juga terhubung dengan LED onboard pada launchpad, sehingga ketika program diunduh ke mikrokontroler. LED user akan berkedip – kedip
Untuk membuild project, klik kanan pada project lalu pilih Build Project, atau klik button dengan icon hammer.
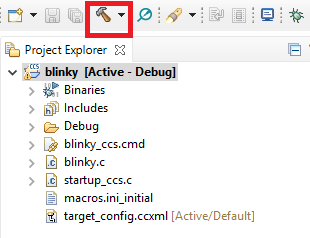
Jika proses build berhasil, blinky.bin akan terbentuk pada direktori Debug . File ini berisi bahasa mesin yang siap ditanam ke dalam mikrokontroler, sehingga mikrokontroler akan menjalankan instruksi yang telah dituliskan pada project blinky
Untuk mengunduh file .bin ke dalam mikrokontroler Tiva C Series akan dijelaskan ke tulisan selanjutnya.


[…] Tutorial Tiva C Series: Blinky! […]